Circuits 101#
Goal. Make a simple circuit that lights up an LED using a battery as a power source. This will introduce you to how electricity flows in a circuit.
Instructions for TinkerCAD#
Components#
- Breadboard - 1 LED (any colour)
- 1 resistor (220Ω or 330Ω is ideal)
- 1 battery holder with 2 AA batteries (3V total) or a 9V battery with a battery clip
- Jumper wires
Step-by-Step Instructions#
-
Understand the Flow#
- Think of a circuit like a water loop. Electricity flows from the battery (power source), through your components (like the LED), and back to the battery.
- + (positive) = where electricity flows from
- – (negative or ground) = where electricity flows to
-
Place the LED on the Breadboard#
- LEDs have two legs: a long leg (+) and a short leg (–).
- Insert the long leg into one row of the breadboard and the short leg into a different row (not the same).
-
Add a Resistor#
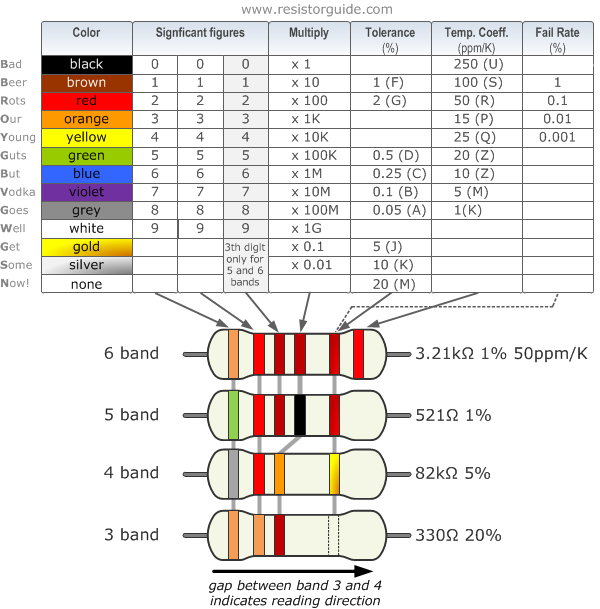
- Connect a 220Ω resistor to the short leg (–) of the LED. This protects the LED from too much power. If you are not sure of what resistor you have you can follow this chart, or ask a technician in the Hackspace.
- Put the other end of the resistor into a separate row on the breadboard.
-
Connect to Power#
- Use a jumper wire to connect the row with the long leg of the LED to the positive (red) wire from the battery pack.
- Use another jumper wire to connect the row with the other end of the resistor to the negative (black) wire from the battery pack.
-
Turn on the Power#
- Insert the batteries into the holder or connect the 9V battery.
- Your LED should light up!
Task#
- Swap out the LED for a different colour.
- Try using two LEDs in series or parallel (what happens to the brightness?).